How to Deploy a WireGuard VPN for AWS Remote Access with Netmaker


AWS has plenty of VPN tools: AWS Client VPN, AWS Direct Connect, and AWS Site-to-Site, just to name a few. You can see a full list here.
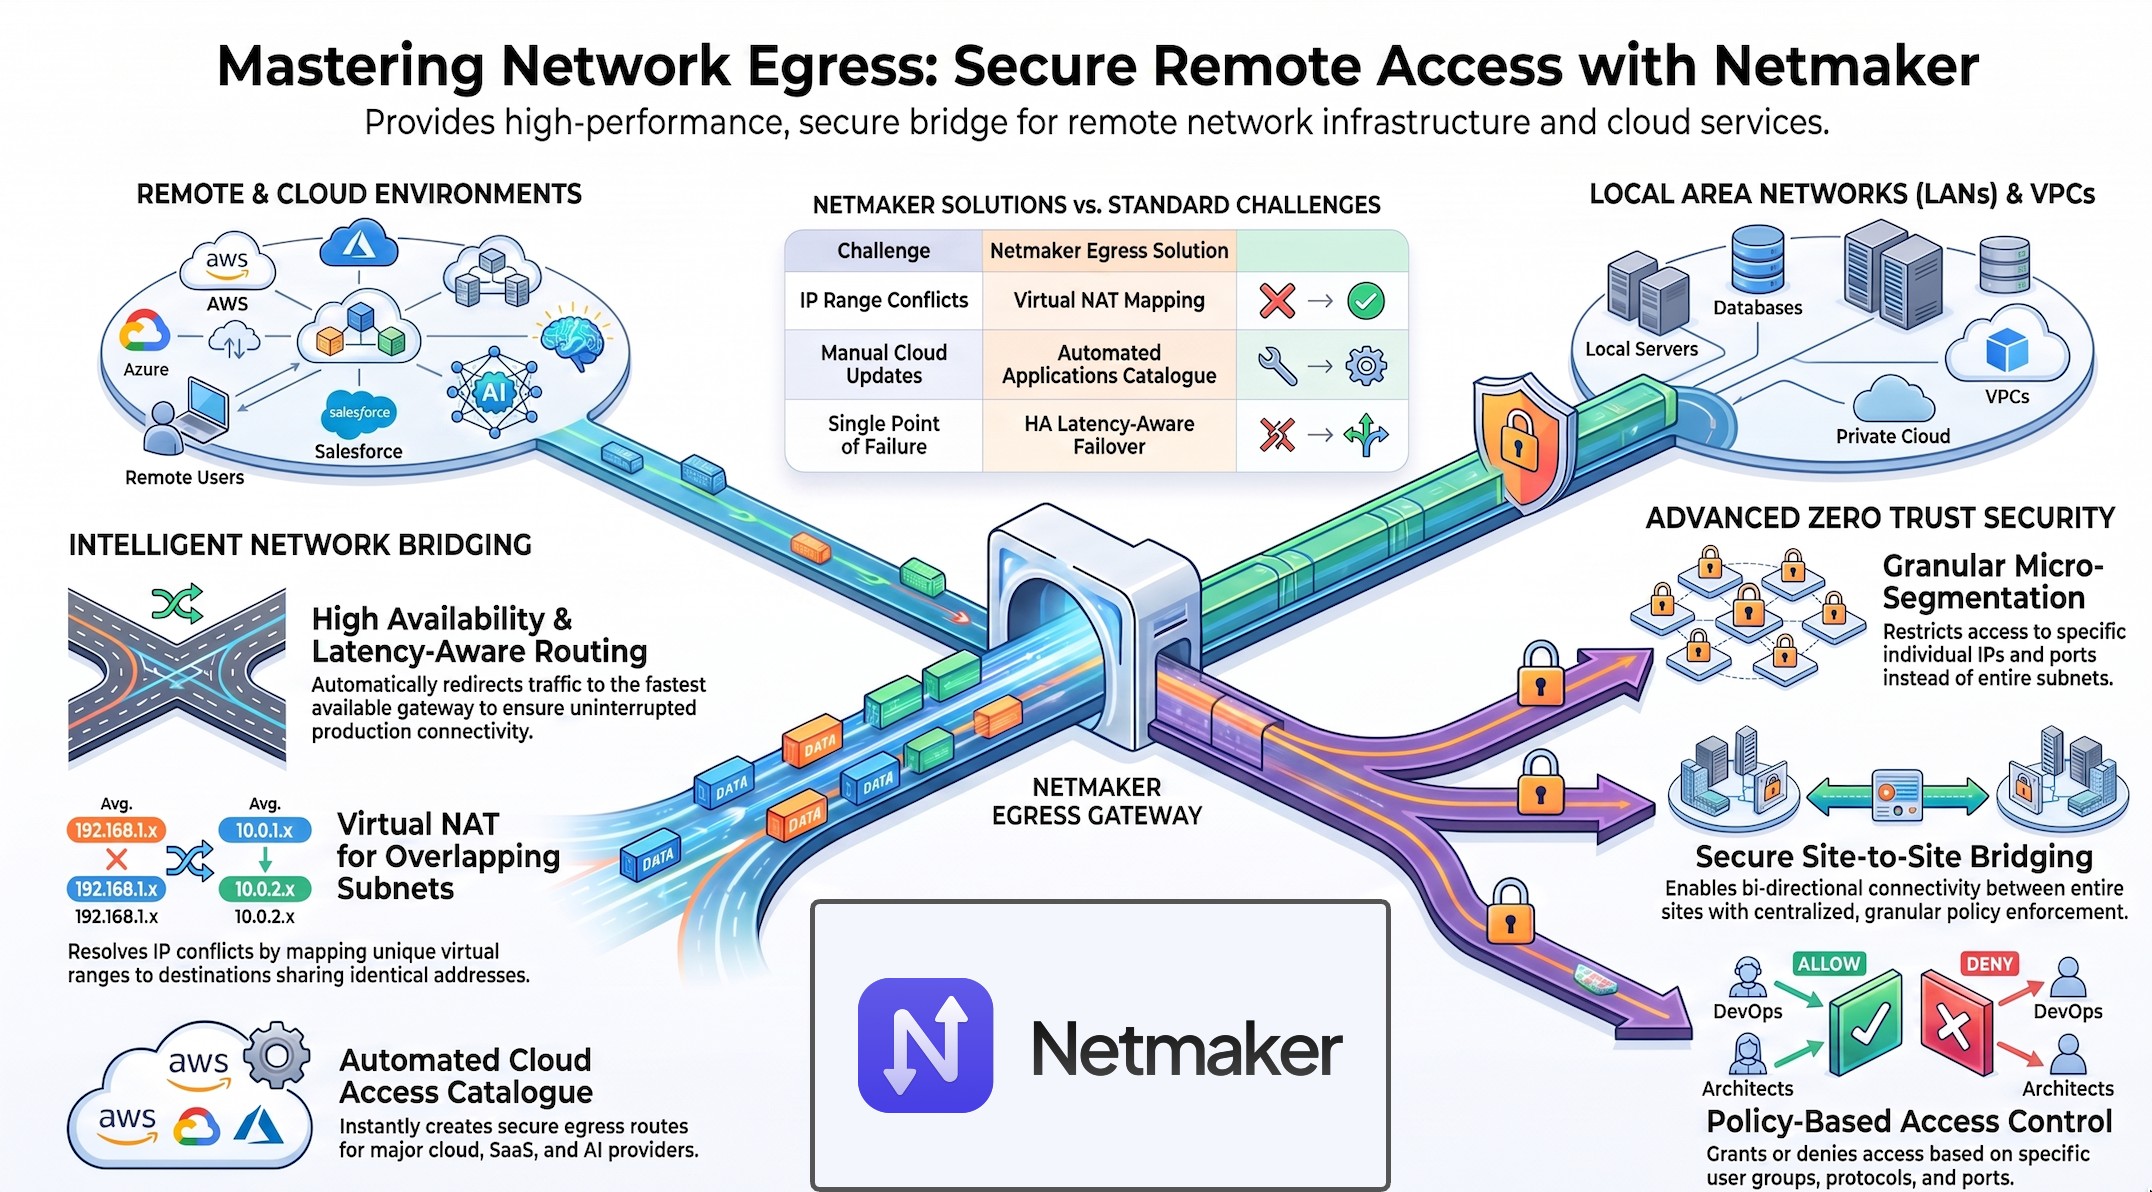
So why would you set up your own VPN on AWS? I wondered the same thing, but a lot of our users were using Netmaker on AWS. I asked them why, and there were three main reasons: cost, configurability, and WireGuard®.
Most of our users are interested in using WireGuard® for their VPN, because it is fast, efficient, and cutting-edge. AWS doesn’t really have any options for this at the moment. If you want to use WireGuard®, you need to roll your own.
In addition, AWS solutions aren’t very customize-able. They tend to be highly tailored for certain use cases. If you need to customize your VPN, again, you probably need a 3rd party solution.
Finally, AWS tools can be very expensive! Sometimes rolling your own solution just makes financial sense.
Today we’re going to set up a common use case among our users: remote access to AWS using WireGuard®. We do this with Netmaker, a powerful virtual networking platform for automating WireGuard® networks.
We’ll set this up in three steps:
- Deploy Netmaker
- Configure Netmaker for Remote Access
- Test Access to a Private Resource over WireGuard

Deploy Netmaker
The first thing we’re going to do is deploy a Lightsail VPS to host Netmaker. You can just as easily use an EC2 instance, so take your pick.
1. Create a machine with the following specs:
- Ubuntu 20.04
- At least 1GB RAM and 1 CPU
- Deployed in the private network you want to reach

2. Configure Networking Rules
Once the instance is deployed, attach a static IP to the server:

Next, go to your instance and set up the firewall. You need ports 443 (tcp) and 51821–51825 (UDP). You can remove port 80 (enabled by default):

3. Install Netmaker
Connect to your host over SSH. You’ll need to set a domain for the server. If you don’t have one or don’t care, you can use the quick install script:
wget -qO -
https://raw.githubusercontent.com/gravitl/netmaker/master/scripts/nm-quick.sh | sudo bash
Otherwise, if you want to use your own domain, follow these instructions.
Configure Netmaker
Once Netmaker is installed successfully, go to the dashboard URL and configure your server for VPC access. First, create an admin user, and log in:


Next, create a network. This is the VPN network, and it has no relation to the VPC. It can have any private address range that you want, so long as it does not overlap with the VPC / private address space on the instance. It is best to configure similar to this:

Once your network is created, click on it. You’ll see a single node in the network, netmaker-1. This is the server. We will configure it as a “gateway” for both inbound devices (ingress), and for outbound traffic (egress).
For the inbound devices, click the button to“Create Ingress Gateway”:


Next, we will configure your server as an “Egress Gateway” to the private network. This can be a bit tricky. You’ll need to examine your AWS settings to determine which private address space (subnet) is correct. You also need to know which interface to use. To do this, on the command line of the server host, type in: “ip a” and look for an address that corresponds to the private network.
For instance, in our case, the private network is 172.26.0.0/16 (the private address range that our Lightsail VPS’s take). When we look at the interfaces locally using “ip a”, we see that there is a corresponding address of 172.26.14.8 on interface eth0, so that is the correct interface.
Author’s Note: While it is out of scope for this tutorial, you can also deploy a “node” into a VPC or private network and set it as the “egress gateway.” This can be very useful if you cannot deploy Netmaker into the target environment, or if you need to access multiple private network ranges.
Once you know the interface and the subnet, you can click “Create Egress Gateway,” and enter the information:


Your server is now ready to use for remote access. All that’s left to do is create a client for use from a device like your laptop or phone. Go to “External Clients” and generate a new client config file. This is just a simple WireGuard config file that can be attached to any machine that runs WireGuard.

Test WireGuard Access
To use the config file, we must have WireGuard installed on the device. If it’s a phone, you can simply scan the generated QR code from the WireGuard app to gain access. If it’s a laptop, you can download the config file and run it using wg-quick:
wg-quick up ~/Downloads/alex-laptop.conf
For this example, I’ve deployed a Wordpress server using Lightsail. By default, the Lightsail VPS gets a public endpoint. You can’t remove the public endpoint, but you can disable the ability to reach it. Simply remove 443 and 80 from the open ports:

Now this server can only be reached from the private address.
I set up WireGuard locally, go to my browser, and voila!

If I turn off WireGuard (using wg-quick down) or try to visit the public endpoint, the website is not accessible.
Our Netmaker server is officially a VPN gateway to our private AWS network.
Conclusion
We’ve now set up remote access to an AWS resource using a WireGuard VPN via Netmaker.
You can do something similar to reach almost any resource in AWS.
Netmaker is a powerful tool and is highly configurable. If there are multiple address spaces you wish to reach (for instance, VPCs in different regions), you can deploy a node into each environment and configure it as an “egress gateway” just as we did above. For more information on deploying nodes (which we did not cover in this tutorial) see here: https://docs.netmaker.org/netclient.html
Disclaimer: WireGuard is a registered trademark of Jason A. Donenfeld.
Enhancing WireGuard VPN Deployment with Netmaker
Netmaker offers a robust solution for deploying WireGuard VPNs on AWS that balances cost-effectiveness, flexibility, and cutting-edge security. One of Netmaker's key advantages is its ability to automate and simplify the deployment of WireGuard, an efficient and fast VPN protocol. By integrating WireGuard into your AWS environment through Netmaker, you gain a highly configurable VPN solution that can be tailored to meet specific networking needs, overcoming the limitations of AWS's native VPN tools. Moreover, Netmaker's intuitive UI and advanced server installation options streamline the setup process, even for complex network architectures, ensuring seamless remote access to AWS resources.
Additionally, Netmaker addresses cost concerns by offering a more affordable alternative to traditional AWS VPN solutions. Its open-source nature allows users to deploy virtual networks without incurring significant expenses associated with proprietary services. Furthermore, Netmaker supports scalability through its compatibility with Docker and Kubernetes, enabling users to efficiently manage expanding network demands. This makes it an ideal choice for businesses looking to optimize their AWS infrastructure without compromising on performance or security. To get started with deploying a WireGuard VPN using Netmaker on AWS, sign up here.


.svg)