How to use Netmaker v0.10, a WireGuard® Virtual Networking Platform (Deep Dive)


In this guide, we’ll be stepping through the installation, configuration, and usage of Netmaker v0.10. If you’re not familiar, Netmaker is a virtual networking platform built on top of WireGuard®, an extremely performant VPN protocol. It’s very, very fast and extremely efficient. You might think of Netmaker as:
- a WireGuard® controller
- Docker® for Networking
- a virtual VPC (yes I know, redundant)
Netmaker makes networking disposable and instantaneous. You have networking where you need it, when you need it, secure and contained. Much like what containers did for compute, Netmaker is doing for networking, with the help of WireGuard®.
This walkthrough is a more organized version of this hour-long YouTube tutorial. If you prefer watching videos, by all means, watch the video!

Introduction
Netmaker can be used to create all sorts of network topologies. By default, it creates a “full mesh” network, meaning all connections are point-to-point.
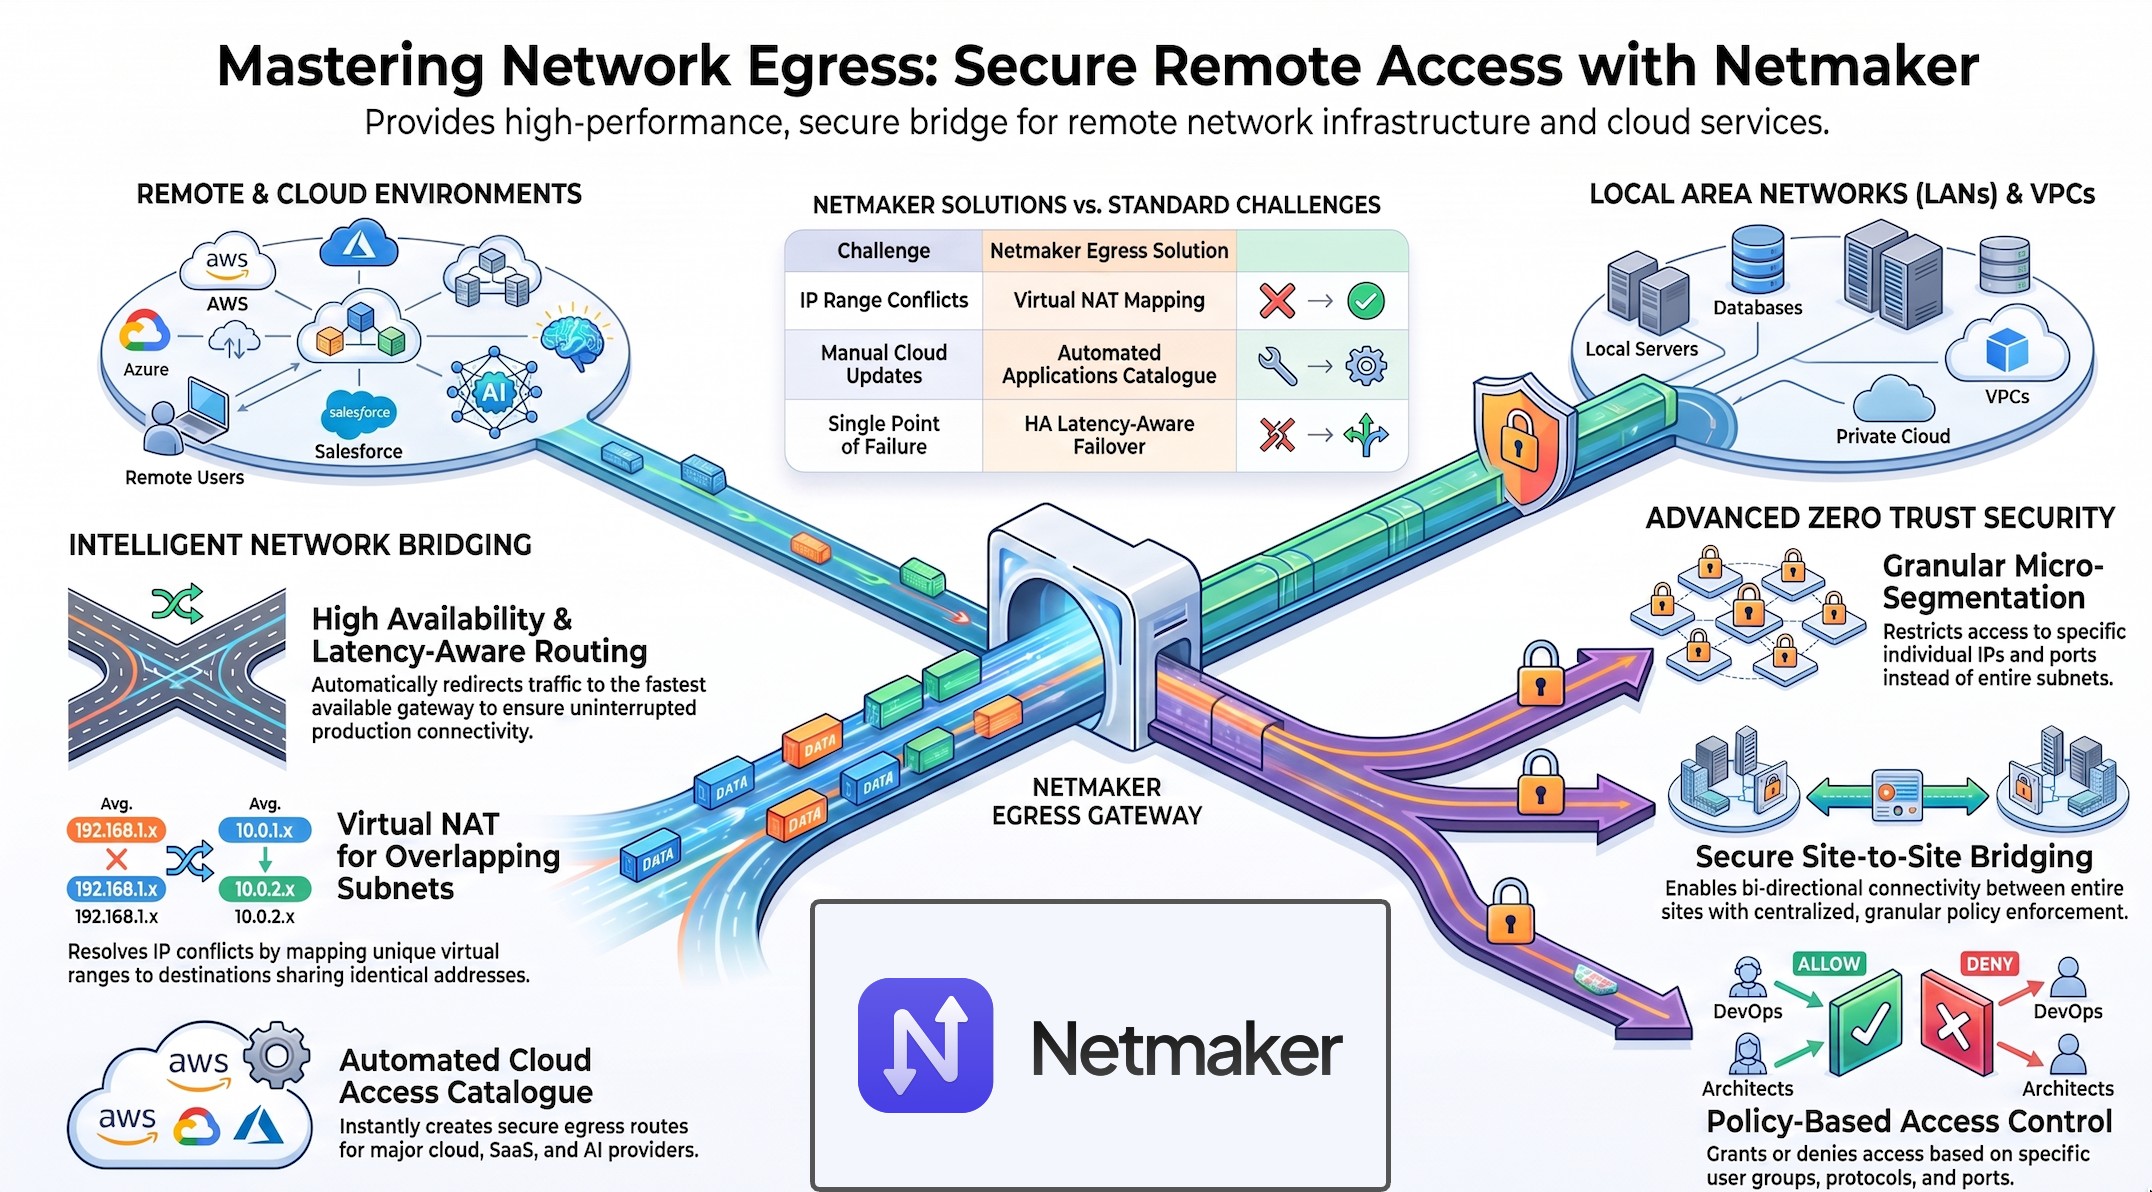
Netmaker can also create inbound (ingress) and outbound (egress) gateways. The Egress Gateway is especially useful for scenarios where you might want a set of machines to have access to resources that are available to only one of the machines.
For instance, imagine you have a machine in any of the following environments:
- AWS
- A Kubernetes Cluster
- An office network
- Your house
- A data center
This machine can act as an “egress gateway,” which allows secure, remote access from the outside.
Check out a few of the network topologies you can create with Netmaker:

Index
- Server Installation
- Initial Setup
- Network Creation & Configuration
- Server Node
- Introduction to Access Keys & Installing
- How to Set up a flat (mesh) network with the Netclient
- Ingress Gateways & External Clients
- Egress Gateways
- Relay Servers
- Scenarios
- Conclusion
Server Installation
You need a server. It can be very small, but it should be public. Why? The whole point of Netmaker is to create distributed virtual networks from machines that are scattered all over the place.
These machines all need to grab configs from the same server (or servers, if configured with high availability). If the Netmaker server runs in a private data center or behind a NAT, then machines outside that environment wont be able to reach it.
For more advanced users, you can set up port forwarding to have the server in your own private environment, but for a typical user, we recommend buying a cheap VPS. You can get one from DigitalOcean for $5/mo, and they have very good bandwidth pricing.
Deploy the machine with Linux. We prefer Ubuntu 20.04. You’ll then need to make sure the right ports are open.
At a minimum, you need to open ports 443 and 51821. For the quick start, you will also need:
- 51821–51830 (One port for each network you create. These are WireGuard Ports)
- 22 (for SSH)
- 80 (If using the quick install. This is just for Caddy to request SSL Certificates using LetsEncrypt)
- 53 (for DNS)
For this walkthrough, we’ll be using the simple “5 minute install” script from the GitHub README.
wget -qO -https://raw.githubusercontent.com/gravitl/netmaker/master/scripts/nm-quick.sh | sudo bash
If you want to use your own domain (rather than the auto-generated .nip.io domain), follow the Quick Install docs. The only difference here is, you’ll need to point your wildcard domain to your VPS’s public IP and tell Caddy to use it.
Here are a few typical things people care about during installation, and what to do about them:
“I don’t want to use Caddy!”
Caddy is the reverse proxy that comes with Netmaker. What is a reverse proxy? It brings traffic from the outside world to your instance. In our case, it is mapping dashboard.yourdomain.com to the UI (127.0.0.1:8082), api.yourdomain.com to the http API (127.0.0.1:8081), and grpc.yourdomain.com to the gRPC endpoint (127.0.0.1:50051).
You can exclude the Caddy component of Netmaker and substitute your own reverse proxy, whether it’s Traefik, Nginx, HAProxy, or anything else.
Just beware, you need to create the domain mappings for the UI, API, and gRPC. gRPC traffic is also special, and often requires extra plugins on reverse proxies (older ones usually don’t even support it).
This is very useful information if you are deploying Netmaker somewhere where you already have a load balancer in place and consuming port 443. In this case, you often need to integrate.
Nginx Docs: https://docs.netmaker.org/server-installation.html#nginx-reverse-proxy-setup-with-https
Traefik Docs: https://github.com/bsherman/netmaker-traefik
If you have another configuration for your environment, consider contributing to our docs!
“I want Netmaker networks on the host machine!”
The default docker-compose deploys Netmaker in “contained” mode. This means VPN traffic flows into the container directly, and will not impact the host networking at all. This is great for keeping Netmaker contained, and makes debugging easier (you can just restart the container to reset all the interfaces). However, often, users want Netmaker networks to be on the host, because they intend to treat the Netmaker server as a sort of “Bastion Server” for access to/from their machines.
In this case, uncomment out "network_mode: host" in docker-compose:

Just be wary, networks may require some manual cleanup if things go wrong.
“I need Netmaker to be highly available!”
Consider deploying Netmaker onto Kubernetes using our HA helm template. OR, setup your own HA configuration using rqlite.
“I need OAuth for my organization!”
You’re in luck, in addition to basic auth (the default), Netmaker supports OAuth with Azure AD, GitHub, or Google. If you need 2fa, you can enable this via your provider.
To set this up, follow the regular Quick Install docs, but before running docker-compose up -d, follow these steps to add the appropriate environment variables to enable OAuth.
For our install, we’ll go back to that README installation script.
Let’s assume you’ve deployed a VPS/VM with Ubuntu 20.04, a publicly-reachable IP address, and the ports 443, 80, 53, and 51821–51830 open and reachable. Let’s assume this machine is dedicated only to Netmaker. Let’s also assume you don’t need OAuth. If all of this is the case, you can run the install script:
wget -qO -https://raw.githubusercontent.com/gravitl/netmaker/master/scripts/nm-quick.sh | sudo bash
This will…
- Install WireGuard® and Docker
- Discover the Public IP and set subdomains using nip.io.
- Download and configure the compose files, and the config files for Caddy and Mosquitto (MQTT).
- Spin up Netmaker
- Create a “default” network, an Access Key, and set up the server as an “Ingress Gateway.”
The output will display the dashboard URL, or you can find it in the Caddyfile. Use this link and open it in your browser.
User Management
Upon first login, you will be greeted with the “Create an Admin” screen. This will be a “super user” on the system who is able to run all commands.

Choose a username and password, click “Create Admin” and then login with that admin.
You will notice a little button in the corner of the login screen for OAuth. If you’ve enabled OAuth, you can use this to log in.
The admin can create additional users. Just click on the Users tab in the sidebar. These can be additional “super users” with full server access, or can be scoped to a limited number of networks.
If the users are not admins, they can edit and control a network, but cannot edit server-level settings.

Network Creation & Configuration
Once a user is created, you can create networks. There is a default deployed with the deploy script, but you may want to create your own. You can also just delete the default if you want to start fresh.

Your new network should have a valid, unique CIDR and a short, descriptive name.
Besides this, decide whether or not you want UDP Hole Punching turned on.
If you are dealing mostly with static servers in cloud / data center environments, it is better to leave it off. If you are dealing largely with end user devices like laptops, or devices behind NAT, it is better to leave on. If turned on, UDP Hole Punching can be switched off at the node level for any nodes that should not have it.
Usually we recommend leaving “Is Local” turned off. It is meant only for a scenario where the nodes should not be communicating over a public network (e.x. They’re all inside a data center network).
Even if you leave this setting off, if nodes are on the same local network, Netmaker will attempt to detect this and use the local network anyway, so it’s almost always better to leave this option disabled.
Finally, you can add ipv6 networking for dual stack, if you want your nodes to have ipv6 addresses.
Once you’ve created a network, you can edit it in the Networks list. There are some additional options here as well.

Particularly worth noting:
- Default Listen Port: If UDP Hole Punching is turned off, nodes will set their port at the first freely available port locally, starting with the Default Listen Port. For example, in Kubernetes, we change this to 31821 to align with the default NodePort range.
- Default Ext Client DNS: If using external clients (to be discussed shortly) you can set their nameserver using this field. If left unset, external clients will not set a nameserver and will rely on the host machine’s DNS.
- Default MTU: In certain environments, you may wish to set the default MTU higher or lower. In general, a higher MTU yields better performance, but may result in connectivity loss. Lower MTU may yield better connectivity, but lower performance. Worth keeping in mind, this sets default network MTU, but it can also be set at the individual node level. Here is a good explainer of Wireguard MTU.
- UDP Hole Punching: You can switch on/off network-wide UDP Hole Punching with this option. If you’re having general network-wide connectivity issues and UDP Hole Punching is turned on, try switching it off, and vice versa.
For explainers of other fields, check out the UI reference.
Server Node
Once a network is created, you can begin adding nodes.
By default, every network has a server node in it. This is the machine where netmaker is running (usually docker-ized). This node cannot be removed, and is necessary for MQ communications as well as private DNS traffic. It always takes the last IP of the network CIDR, so that other nodes know where to find it.

You will usually have no reason to edit this node. However, there are a few editable settings such as MTU. Worth noting, in the current release, sometimes the server node can get out of sync. To troubleshoot, you can either change a setting on the node such as MTU or Keepalive, or restart the netmaker container on the host.
Introduction to Access Keys & Installing
To start building our network, we will need an access key.
You can click on the access key tab and create a key, giving it a number of uses. Typically the number of uses will relate to the number of nodes you want to create. There is currently no concept of an “unlimited” key, but you could give the key a very high number of uses (e.x. 9999999) if you plan on using it with a lot of automation. If you do not set the Name or Uses field, it will generate a random name and have one use.
Keys can be deleted to invalidate them. They will automatically delete when “uses” reach zero.
Client Install Commands

Clicking on a netclient key will display the install instructions. Typically you will ignore the “Access Key” and “Access Token” fields and just use the correct “Client Install” command.
A command is listed for Linux, FreeBSD, and Mac, which is just an installer script. There is also an installer script for Windows. Finally, there’s a “docker run” command for running the netclient as a container.
Below all these is the “Manual Install” command, which is just:
“netclient join -t <token>”
This assumes you have downloaded the appropriate netclient from the releases page on Github.
You should also use the join command (rather than install script) for joining additional networks from the same machine, since the installer script attempts to download dependencies.
Network Setup with the Netclient
Once you have your access key, it’s easy to join nodes to the network. Simply SSH to each machine you would like to join to the network and run the install command, for example:
curl -sfL https://raw.githubusercontent.com/gravitl/netmaker/master/scripts/netclient-install.sh | sudo VERSION=v0.10.0 KEY=eyJjb3JlcGN3Z3B1YmtleSI6IiIsI....cGN3Z2VuZHBvaW50IjoiIn0= sh -
Things to keep in mind: If running the installer, it will try to install WireGuard®. If not running with the installer, WireGuard® must already be installed (either kernel or wireguard-go). Additionally, it will try to install resolvectl on Linux for DNS.
If you are not using UDP Hole Punching, make sure the appropriate port is open (usually 51821).
There are many options you can set while joining a network. Just look at the helper text:
A couple important ones to note:
- port: change the port used (when udp hole punching is off)
- udpholepunch: can set to “no” even when set to “yes” at the network level
- dnson: can set to “no” to prevent setting dns
- daemon: can set to “off” to avoid creating a system daemon (can be good for testing / troubleshooting)
After joining, you should see the other nodes in the network immediately, and communication should be possible very soon:

You can check out and manage the interfaces much like a regular WireGuard® interface on most systems like Linux, Mac, Windows, and FreeBSD. The interface will typically be named “nm-” + “network name.” For instance “nm-mynet.”
Keep in mind, while the netclient is running, it will attempt to sync the interface with the correct config. If you manually edit the interface / wireguard config, it will likely revert. However, you can stop the daemon by running systemctl stop netclient.
You can keep an eye on the running netclient daemon on Linux by running…
journalctl -fu netclient
systemctl status netclient
A helpful tip its to run systemctl restart netclient if it is not recieving updates. Another helpful troubleshooting tip is to run
netclient pull or netclient checkin
Which will sync the latest settings.
Lastly, you can run netclient leave -n <net name> to leave a network, or netclient uninstall to uninstall entirely.
OR, you can skip all this and manage via the UI.
UI Node Management
Once you’ve added a few nodes, management becomes pretty easy via the UI. You get a couple different options.
#1: Node List

#2: Graph View

Both of these views give you the same information and management options, but the graph view definitely looks cooler. Either way, you can click on any node and edit its settings.
The node will be sent an update from the server, and all the peers will be notified if they must update their configuration as well (for instance, if you change the private IP):

A couple key configuration options to keep in mind:
- IP Address: The private IP of the machine in the network CIDR
- AllowedIPs: Any ADDITIONAL private addresses you would like to assign to the node
- Endpoint: The reachable public IP: If setting, must turn “Is Static” on our it will automatically reset.
- UDP Hole Punching: Turn off if you would like it to use a static port (good idea for servers).
Ingress Gateways & External Clients
After your network is created, you will have a flat, peer-to-peer network where all nodes can reach all other nodes. This is referred to as a “mesh VPN.” However, there may be other patterns you want to implement.
An Ingress Gateway creates a single point of entry to your “mesh network.” This can be useful for remote access. It is also necessary for devices where the netclient can’t run. This includes Android and iOS devices. If you would like to add them to the network, you must set a machine as an “ingress gateway”, create an external client config, and set that config on your phone using the official WireGuard® app.
Typically, an Ingress Gateway should be a reliable server in a public location. Since the Netmaker server also has this requirement, you can usually use the Netmaker server as your Ingress Gateway.
Simply click the button to create it.

Once created, you can add “external clients” to your network via the gateway. Just go to the Ext. Clients page and click to create:

The default names are goofy, but editable (you can click and change the name).
From here, all you have to do is download the config file to your machine, or scan the QR code. The config file is just a standard WireGuard® config file and will look something like this:
[Interface]
Address = 10.1.1.1/32
PrivateKey = yLX3ftDsnuGxNIoZujFBLi3DBDClRc2I=[Peer]
PublicKey = WFeTWh1t7QiM1+G+k7QnrZqMVAo=
AllowedIPs = 10.1.1.0/24
Endpoint = 52.23.167.144:51821
PersistentKeepalive = 20
The client will have only one peer (the gateway).
Important to note, there is no agent (netclient) running on the external clients, meaning they cannot update automatically.
If the Gateway config changes (endpoint, port, or publickey), the clients will require new config files to access they gateway. This is why we recommend a stable public server as the gateway node.
Once activated, external clients have access to the full network, including egress gateway ranges, via the ingress gateway server.
In general, if you’re having trouble adding a device to your network via Netclient, we recommend just hooking it in via Ingress Gateway.
Egress Gateways
Egress Gateways are the opposite of Ingress Gateways. They allow nodes in your network (including external clients) to reach an external address range. This could be…
- a home network
- an office network
- a kubernetes cluster network
- a cloud VPC
- a data center
…Any subnet really. If a remote subnet needs to be accessible, an egress gateway will do the trick. It can handle an arbitrary number of ranges (at least dozens, potentially hundreds), and can even handle individual addresses. If there’s three ec2-instances in your AWS account which require remote access, you can either give acess to the fill subnet, or simply type in their individual addresses with the /32 mask.

You need two key pieces of information to create an egress gateway: The ranges, and the interface. The ranges are the subnets/cidrs/ips you need access to (comma separated) and the interface is the interface on that machine which maps to those IP addresses.
Addresses can be added/removed post-creation by editing the node and changing the “egress ranges” field.
Relay Servers
A relay server makes machines reachable which are un-reachable via direct p2p connection. This can happen for many reasons, such as a CGNAT, a 4g LTE router, or a double NAT.
In any of these situations, a direct peer connection may not be possible. Here, you can simply use a reliable, public node (such as the Netmaker server) as the relay.
The peer can always establish a connection with the relay because it is public. This machine will then pass traffic to/from the machine and other nodes in the network.

An egress gateway can also exist behind a relayed node, which can be helpful for establishing a deep connection into a typically unreachable network.
Patterns / Use Cases
There are a few patterns that these tools enable which we will not go into, but you should be aware of:
#1 Remote Access: Set up remote access to a network by using a two-node network, one as ingress and one as egress. Then create ext client configs which you add to your phone / laptop, making the remote network accessible (can also just use regular netclient + egress gateway).
#2 Kubernetes: We use Netmaker to create distributed clusters, using the mesh VPN as the “underlay” subnet. We also use Netmaker to establish multi-cluster networking (similar to submariner), where an egress gateway on each cluster acts as an entry point to the pod/ service network.
#3 Internet VPN / NAT Gateway: You can create an internet VPN / NAT Gateway as a way to manage internet-bound traffic from nodes. In the egress gateway, simply use the following range. Use this instead of 0.0.0.0/0. 0.0.0.0/0 will be ignored by netclients:
0.0.0.0/5,8.0.0.0/7,11.0.0.0/8,12.0.0.0/6,16.0.0.0/4,32.0.0.0/3,64.0.0.0/2,128.0.0.0/3,160.0.0.0/5,168.0.0.0/6,172.0.0.0/12,172.32.0.0/11,172.64.0.0/10,172.128.0.0/9,173.0.0.0/8,174.0.0.0/7,176.0.0.0/4,192.0.0.0/9,192.128.0.0/11,192.160.0.0/13,192.169.0.0/16,192.170.0.0/15,192.172.0.0/14,192.176.0.0/12,192.192.0.0/10,193.0.0.0/8,194.0.0.0/7,196.0.0.0/6,200.0.0.0/5,208.0.0.0/4
Conclusion
We covered installation, initial setup, network creation, node creation, and network management via Egress, Ingress, and Relay.
We could go deeper on any of these topics, but that is better left for the next tutorial. If you would like to keep learning, check out these resources:
I hope you enjoyed! One last note, you can always join our discord server and ask questions there.
Disclaimer:WireGuard is a registered trademark of Jason A. Donenfeld.
Enhancing Network Flexibility with Netmaker
Netmaker simplifies the creation and management of virtual networks, addressing common networking challenges by leveraging the power of WireGuard®. Its ability to establish full mesh networks ensures direct, secure communication between nodes, reducing latency and improving overall network performance. With features such as ingress and egress gateways, Netmaker allows seamless integration with existing network infrastructure, providing flexible routing and improved control over data traffic. This capability is particularly useful for organizations looking to enhance their network's scalability and efficiency without compromising on security.
Additionally, Netmaker's compatibility with container orchestration platforms like Docker and Kubernetes allows it to integrate smoothly into modern DevOps workflows, facilitating rapid deployment and scaling of network resources. By automating the network setup and management process, Netmaker reduces the complexity of traditional VPN solutions, making it easier for organizations to establish secure connections across diverse environments. For those looking to streamline their network operations and improve connectivity, get started with Netmaker today to experience a more efficient and secure networking solution.


.svg)